Control joints in plaster claddings
22 Mar 2014, Prove Your Know How, Technical
Avoid random cracking that can compromise weather tightness by ensuring movement control joints are properly located.
External plastered and textured finishes to framed buildings are popular in New Zealand’s housing market, but it’s essential that builders use well-located movement control joints to prevent cracking. This cracking could be a result of:
- Building movement due to timber shrinkage, earthquakes or changes in moisture content.
- Temperature changes causing expansion and contraction, particularly when dark finishes are applied.
- Curing shrinkage in cement-based plasters – in particular, stucco.
- Lack of movement control joints.
Movement control joints
Movement control joints are an essential part of the weathertightness performance of an external plaster finish. They manage cracking by:
- Creating lines of weakness at predetermined locations in the plaster, so that cracking occurs on these lines.
- Forming a defined break or discontinuity in the cladding, such as a flashed joint.
NB: The installation requirements for movement control joints depend on the plaster finish specified.
Choose locations during design
The location of movement control joints will depend on the appearance of the building and the plaster cladding specified. They must be determined during the design of the building and shown on the consent documentation, not left to the plasterer on site.
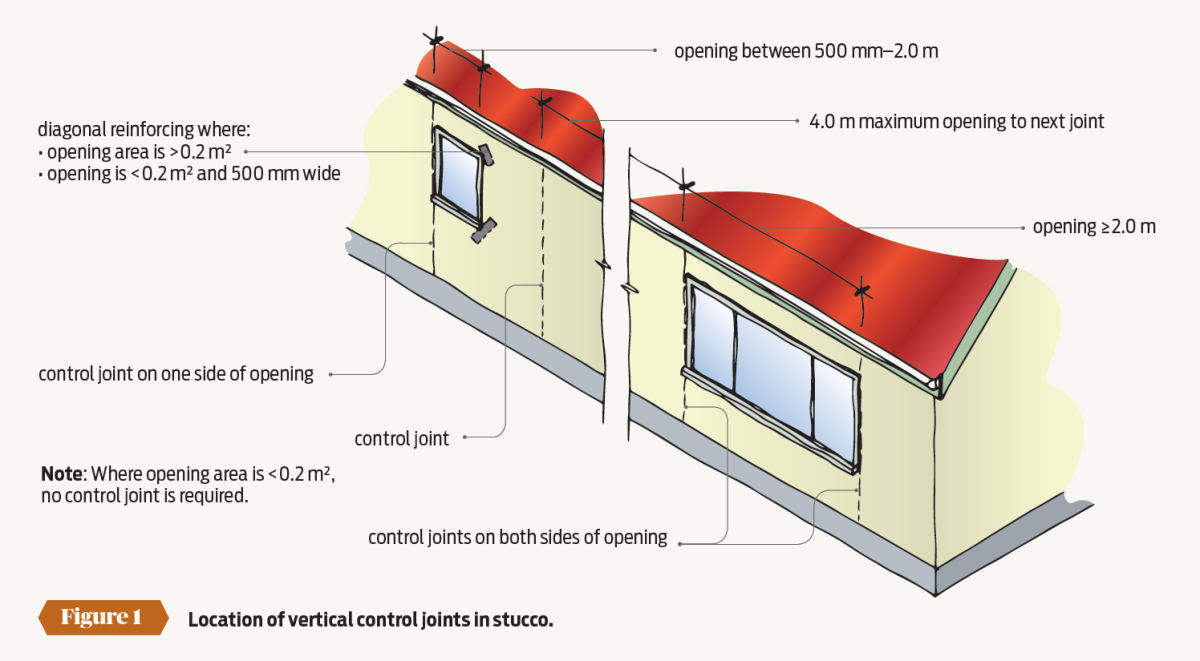
Control joints in stucco
Requirements for reinforced stucco over a drained and vented cavity with a rigid or non-rigid backing are set out in NZS 4251.1:2007 Solid plastering – Cement plasters for walls, ceilings and soffits. The maximum stud height for non-rigid backing is 2.4 m. Section 2.1.9 states that control joints must be located:
- Vertically
- – on both sides of openings 2.0 m wide or greater
- – on one side of openings less than 2.0 m wide
(A vertical control joint is not required when the opening is less than 500 mm wide and the area of the opening is less than 0.2 m². Diagonal reinforcing will be needed at all four corners instead.)
- Horizontally at inter-storey floor levels.
- To break up expanses of wall more than 12 m² (locate them at not more than 4 m spacings vertically and horizontally).
- At changes in wall cross-section or height.
- At any point where natural flexing of a structure may occur, such as at the top of a plate level of a gable wall or where there is a cantilevered deck.
(See Figure 1).
Textured finishes
Textured finishes (typically a modified cement, but can be acrylic plasters) may be applied over a range of substrates, including flush-stopped fibre-cement sheets, polystyrene (EIFS cladding systems, proprietary polystyrene block construction), clay bricks, concrete masonry and concrete.
Although the requirements for movement control joints vary for each cladding type, they all require that any movement control joint in the substrate is carried through the plaster finish, so the movement control joint in concrete masonry construction or the substrate support changes from solid to framed construction.
For flush-stopped, texture-coated fibre-cement cladding, movement control joints are typically required:
- Horizontally at each floor level.
- Vertically at 3.6–5.4 m along the wall for timber-framed walls (7.2 m typically for steel-framed walls).
- Above and below the jambs of openings.
For EIFS cladding, refer to the specific supplier’s requirements.
Vertical movement control joints
Vertical movement control joints are 10 -12 mm wide gaps between plastered sections and can be formed by the following methods:
- Plastering up to an angle, T-section or proprietary joint former (see Figures 2 and 3). Materials for the joint former include hot-dip galvanised steel, powder-coated hot-dip galvanised steel, stainless steel, powder-coated aluminium and uPVC. Lath or wire mesh reinforcing must not be carried across stucco control joints.
- Creating a sealant joint where the sealant is installed over a bond breaker or backing rod. (Adding a back flashing to the detail increases the robustness of the joint should the sealant fail.)
- Creating an expressed open drained joint.
- Leaving the joint open but covering with a vertical batten.
Stucco joints may also be created by a V-groove cut into the first (scratch) and second plaster coats before they have fully hardened, or plaster can be applied to a temporary batten. Joint edges that have been formed by cutting or inserting a temporary batten must be primed before the sealant is applied – sealant applied directly to the plaster will not adhere to the sides of the joint. Adding a backflashing to these joint locations is recommended.
“Movement control joints are an essential part of the weathertightness performance of an external plaster finish
Joint sealing
To achieve a waterproof vertical movement control joint, it is essential that the sealant used is correctly applied. The gap must be filled with either a polyurethane, polysulphide or neutral cure silicon-type sealant inserted over a PEF backing rod or ond breaker tape (see Figures 4 and 5).
If correctly applied, the sealant should adhere to both sides of the joint and have a cross-section that is thinner in the middle than at the edges – this will ensure that the sealant can accommodate any movement in the plaster. A good sealant to joint ratio is 2:1; for a 10 mm wide joint, the sealant should be 5 mm deep in the middle of the joint.
Horizontal movement control joints
Horizontal movement control joints are typically flashed (see Figure 6)


Register to earn LBP Points Sign in