Sizing up trimming studs
12 Jun 2014, Featured, Prove Your Know How, Technical
Knowing what size trimming studs to use is easy once you understand how to use the tables in NZS 3604:2011. Ensure you’re on the right track with the examples below.
NZS 3604:2011 timber-framed buildings includes the requirements that trimming studs:
Are to be the same width as the wall studs – ie, if the wall studs are 90 mm wide, the trimming studs must also be 90 mm wide.
Whether single or built up with multiple studs, must have no holes or notches in the middle third of the height of the stud.
Cannot include a doubling stud supporting a lintel that is more than 400 mm shorter than the wall studs.
Details of example
The following examples and figures demonstrate how to select the correct size of trimming studs. The specific details to be used (see Figure 1) are:
- Single or top storey.
- Extra high wind zone.
- Maximum of 2.7 m stud length.
- Loaded dimension = 6 m.
- Stud spacing = 600 mm centres.
- Opening maximum = 3.3 m.
- Light roof.
Step 1 – Lintel size
Use NZS 3604:2011 Table 8.9 ‘Lintel supporting roof only’ for all wind zones to determine the lintel size for the span and to make sure what is proposed is within the scope of NZS 3604:2011.
In this example, a light roof with loaded dimension of 6 m requires a 290 × 90 mm lintel to span an opening of 3.3 m (see Figure 2).
Step 2 – Wall stud thickness
Now go to Table 8.2 to determine the wall stud thickness required. This information is required to calculate the trimming stud size in Table 8.5.
For this example, choose (a) Single or top storey – light and heavy roof, extra high wind zone and loaded dimension of 6 m, then 2.7 m maximum stud length and maximum stud spacing of 600mm. This gives a stud thickness of 90 mm (see Figure 3).
Step 3 – Maximum clear width of opening
Go to Table 8.5 ‘Trimming studs’.
For this example, choose (a) Single storey, top storey or non-loadbearing walls. The maximum width of opening is 3.3 m, so the opening is over 3.0 m but under 3.6 m. Choose maximum clear width 3.6 m (see Figure 4).
Step 4 – Enter stud thickness
Move to the centre column in Table 8.5 and choose the stud thickness that was obtained in step 2 – 90 mm in this example (see Figure 4).
Step 5 – Trimming stud size
Now read across to the right column in Table 8.5 to obtain the thickness of the trimming studs – 180 mm (see Figure 4).
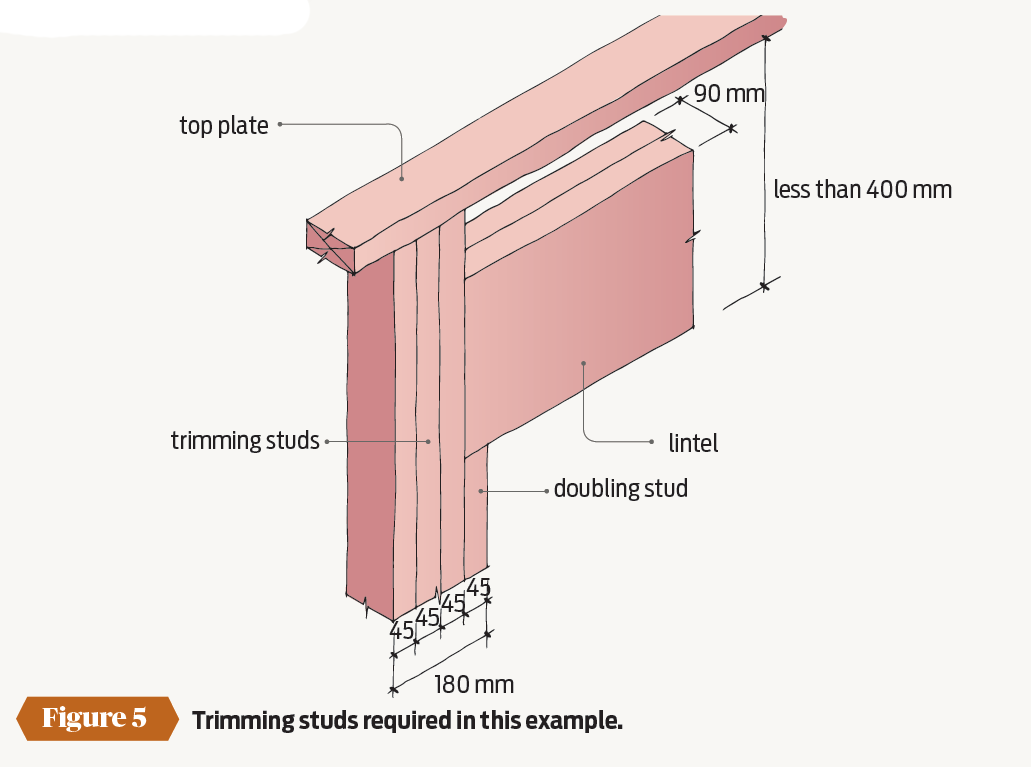
Three 90 × 45 mm plus the doubling stud gives the required 180 mm trimming stud.
Because this lintel is less then 400 mm down, the doubling stud can be included in the total width of the trimming studs (see Figure 5).
Nailing
Nailing of built-up members was covered in Build 136 June/July 2013, page 33, together with the requirements for lintels, trimming
studs etc.
NOTE: A lintel of this size will require significant fixings in an extra-high wind zone.


Building healthier homes
BRANZ offers one-stop resource for sustainable building information.
BRANZ has published a full set of publications as part of its Level Sustainability Building Series. Topics covered include coatings, electrical design, energy, floor coverings, heating and ventilation, materials, passive design, plumbing, water, wet areas and windows.
This series is aimed at builders, architects and designers to allow them to help homeowners design and build homes, which have less impact on the environment and are healthier, more comfortable and have lower running costs.
Packed with numerous drawings and photos, this series offers practical advice. Books are available to purchase for $36 + $8 p&p. They can be ordered online www.branz.co.nz or call 0800 80 80 85 (press 2).

Register to earn LBP Points Sign in