Waterproofing tiled showers (part 2)
17 May 2017, Featured, Prove Your Know How, Technical
The second part of this article covers how to correctly prepare substrates for tiling and the importance of ensuring membranes are waterproof
Correct substrate installation and preparation of tiled shower floors and walls are essential for the shower to remain fully waterproofed. Create falls during substrate installation.
Prep for tiling for floors
The minimum for suspended timber floors under a tiled shower should be one of the following:
- H3.2 treated, 17mm thick minimum, CD grade structural ply with the C face upwards (LOSP-treated ply must not be used), supported at 400mm maximum spacings in both directions. Fix with 10 gauge, 50mm stainless steel, countersunk screws at 150mm centres maximum at the sheet edges and 200mm centres maximum across the sheet.
- 20mm thick, treated RWB, wet area grade sheet material supported at 400mm centres maximum and installed according to the manufacturer’s instructions.
- 19 or 22mm thick sealed, fibre-cement flooring installed according to the manufacturer’s instructions.
- 18mm fibre-cement compressed sheet flooring or 6mm thick fibre-cement sheet tile underlay laid over flooring (minimum H1.2 flooring or H3 plywood) and fixed according to the manufacturer’s instructions.
The substrate must not deflect more than 1/360th of the span under dead and live loads. For example, where L = the span between joists:
- If L = 400mm
- L/360 = 400/360 = 1.1mm is the maximum permitted deflection.
Concrete floors can have a rebate formed in the slab with the falls created using a mortar bed, or the falls can be incorporated when the floor is laid.
A waterproof membrane should be laid over (not under) a mortar bed to ensure that the mortar remains dry.
Proprietary metal or acrylic tray-type shower bases, over which tiles can be laid, are also available. Install according to the manufacturer’s instructions.
They may require notching the framing or packing out the sheet wall lining material to provide the required waterproofing detail at the tray/wall lining junction.
The floor outlet, either a conventional waste or a channel drain, should be specifically designed for use with a waterproof membrane and tiles. Rebate flanges into the substrate to create a flush surface, so drainage is not restricted, and seal the waterproofing system onto the flanges (Figure 5).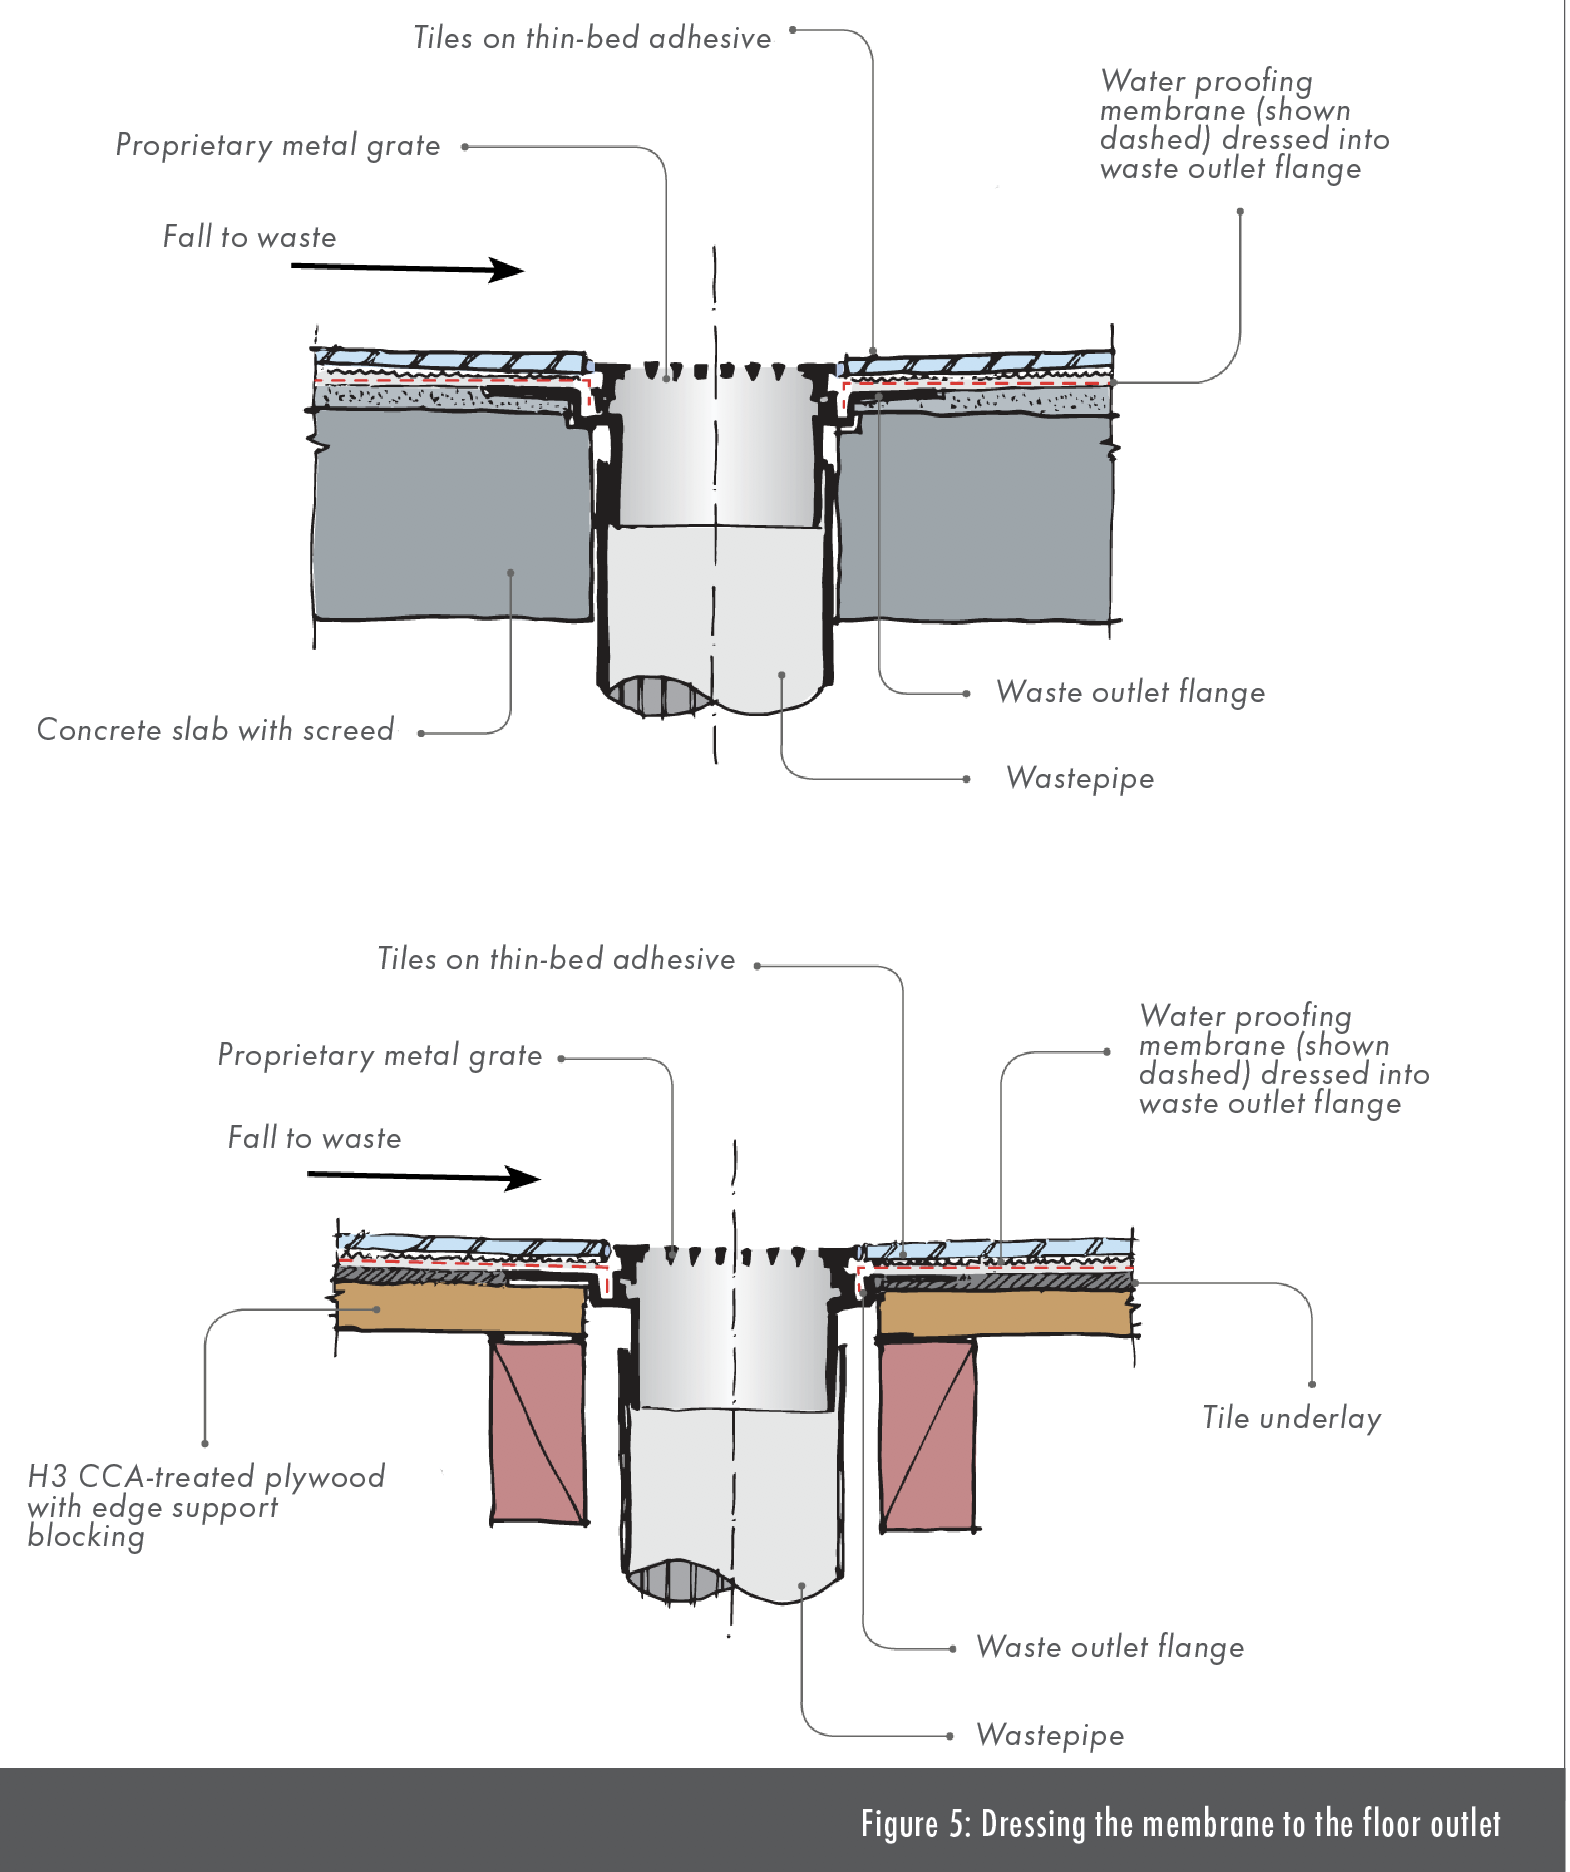
Prep for tiling for walls
The wall substrate under tiles should be:
- 6 or 9mm thick fibre-cement sheet.
- 10 or 13mm thick wet area plasterboard.
- A proprietary waterproof sheet material such as closed-cell polystyrene insulation board with a reinforced cement polymer mortar surface.
Fibre-cement sheet and plasterboard should be fixed with stainless steel screws at spacings recommended by the manufacturer. Fill the gap at the junction of the base of the wall substrate with the flooring substrate with a continuous bead of sealant and apply sealant around fittings and taps where they penetrate the substrate.
Proprietary waterproof sheet materials should be fixed to the manufacturer’s instructions. The waterproofing membrane must cover the sealant around each penetration (see Figure 6).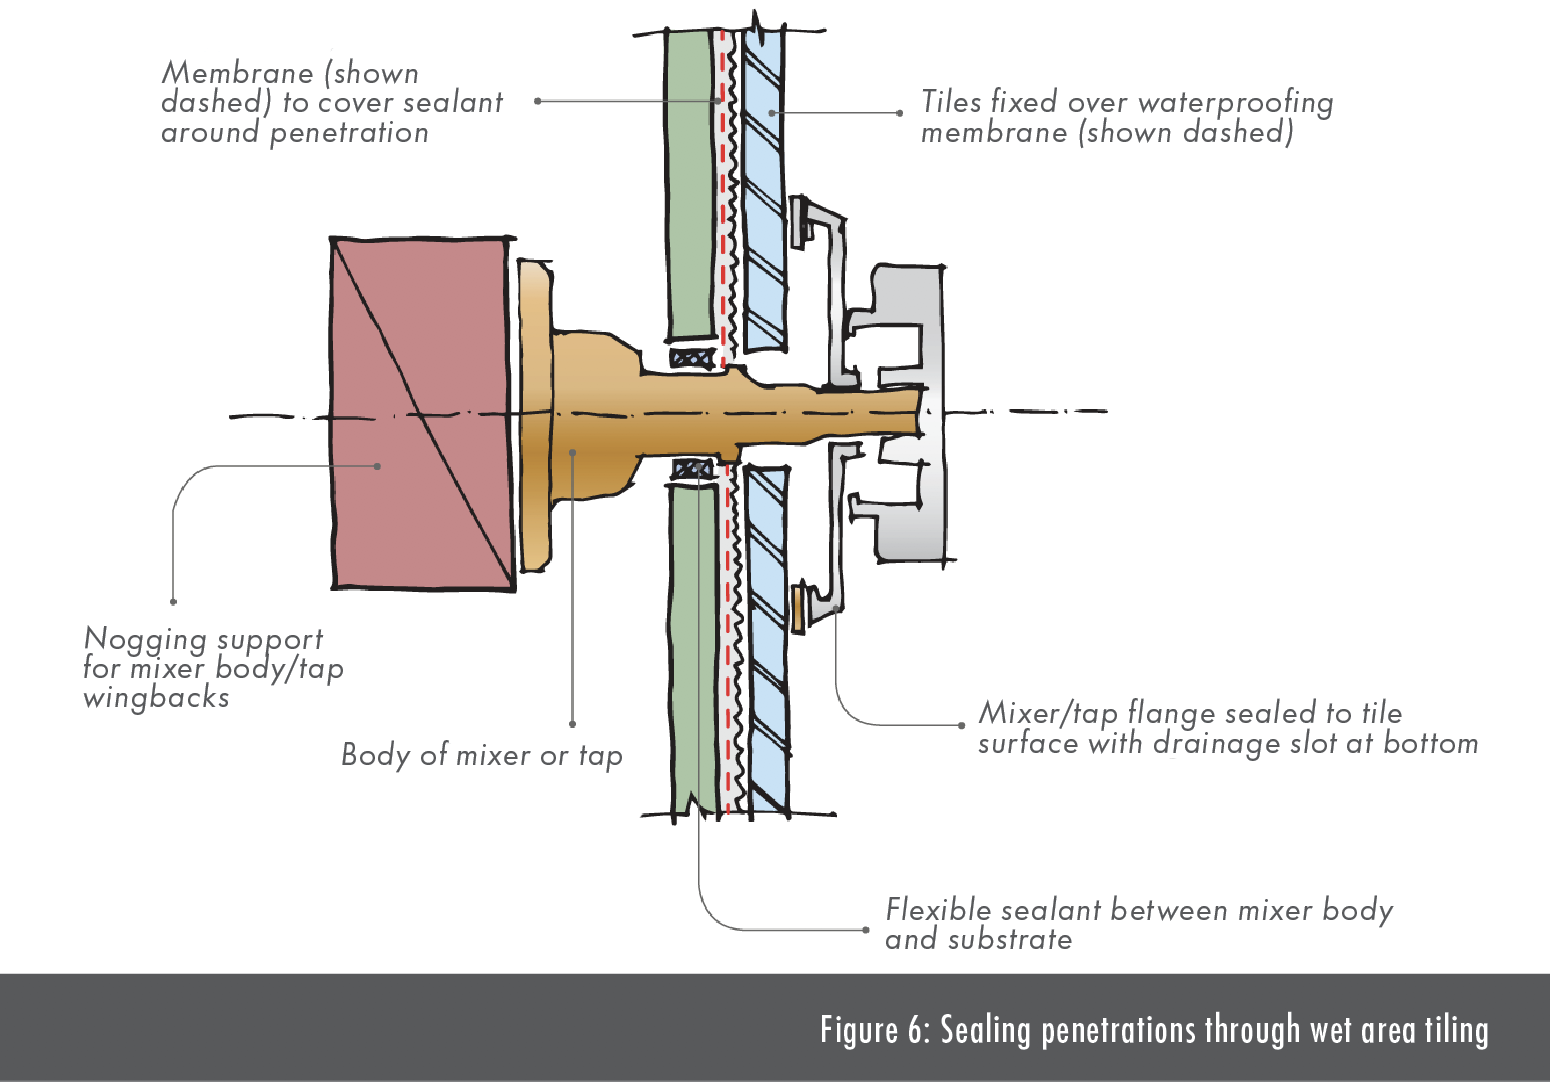
Range of waterproofing systems
Waterproofing systems available for interior tiling include a range of liquid-applied systems, such as:
- Liquid-applied polymer (acrylic) gels or pastes.
- Styrene butadiene co-polymer latex admixtures (SBRS).
- Liquid-applied acrylic or latex-modified two-part cementitious coatings.
- One-part waterborne elastomeric moisture-cured polyurethanes.
- Glass fibre reinforced resins.
Reinforcement such as fibreglass, polyester mesh or chopped strand microfibre may be incorporated into the waterproofing material.
Also available are sheet waterproofing systems, such as:
- Polyvinyl chloride (PVC) sheet material.
- Chlorinated polyethylene (CPE) sheet material.
- SBS (styrene butadiene styrene) – modified rubberised asphalt material.
Applying the waterproof membrane
All waterproofing systems will require application according to the manufacturers’ instructions by a specialist applicator for the warranty to be valid.
Liquid-applied membranes
Before applying liquid-applied membranes, prime as required using a primer recommended by the manufacturer.
Membranes must be applied according to the manufacturer’s specified number of coats to achieve dry film thickness and be allowed to fully cure between coats and before flood testing (generally at least 24 hours at 20°C).
Don’t apply heat to speed the curing process, as it may cause the membrane to skin while remaining uncured below the skin. Ensure the membrane has adhered to the outlet flanges.
Glass fibre reinforced resins are less flexible than other liquid-applied membranes, so they must have a rigid substrate. Bond breakers may be required at changes of direction.
Sheet systems
Flexible, welded sheet materials may require priming to aid adhesion. They are typically 1-1.5mm thick and supplied in 900mm wide sheets. They generally need to be installed with 50mm side laps and 50mm end laps.
Joints, junctions and corners are heat welded and the membrane is heat welded to flange outlets. The wall sheet must overlap the floor sheet upstand.
They have advantages in that there is no drying or curing time, so tiles can be laid immediately and they can span small cracks in the substrate.
Protect and test
Protect all waterproofing material from damage before laying tiles. Once installed and cured as necessary, and before the tiles are laid, carry out a flood test to ensure that the whole area is fully waterproofed.
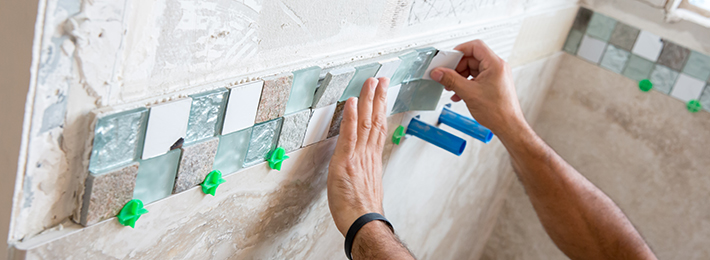
Tiling and grouting
Select a tile adhesive that is compatible with the waterproof membrane, and ensure that tiles and grout are compatible.
Spread the grout diagonally across tiles, forcing it into all joints. Remove excess grout with a damp sponge.
Apply a suitable sealant at the junctions between horizontal and vertical tiles. Also apply additional sealant around the tops and sides of fittings and tap flanges, leaving a drainage slot over the tiles at the bottom edge.
Finally, adding a proprietary clear sealer to grout will reduce moisture absorption.
© BRANZ. From Build 150, Oct/Nov 2016, www.buildmagazine.nz
To read the first part of ‘Waterproofing tiled showers’ click here.
Register to earn LBP Points Sign in
2 Comments
Leave a Reply
You must be logged in to post a comment.

Awesome quiz
interesting article