Horizontal timber weatherboards
25 Mar 2024, Learn, Prove Your Know How, Technical

Horizontal timber weatherboards have been a popular cladding material for houses in Aotearoa New Zealand for many years, with an excellent track record for durability when properly installed and maintained. Even when maintenance has been less than ideal, timber weatherboards have sometimes lasted more than 100 years
Apart from their durability and as seen by their long-term use in our housing, timber weatherboards have a range of other benefits, including availability of a wide range of timber and profiles, ease of installation and the ability to cope with seismic, thermal and moisture movement. They also have good impact resistance, good drying in both direct-fixed and cavity installations and a proven performance history.
However, they are slower to install than some other claddings, and as timber is hygroscopic, that is, absorbs moisture from the atmosphere, the boards move with changes in moisture content. Due to the large number of horizontal joints, there is an increased risk of water entry, and paint and stain finishes require regular recoating.
Weatherboard profiles
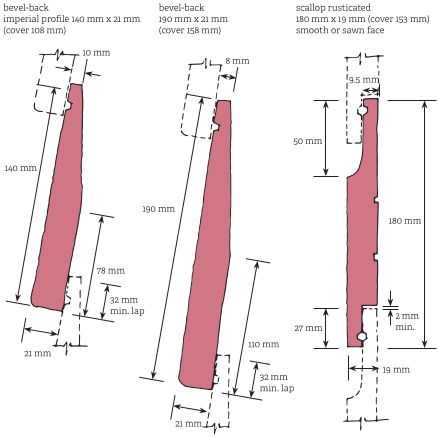
Horizontal timber weatherboards are typically either a bevel-back or rusticated profile (see Figure 1). Standard profiles are described in NZS 3617:1979 Specification for profiles of weatherboards, fascia boards, and flooring and BRANZ Bulletin 411 Recommended timber cladding profiles.
Weatherboards on older houses, however, are likely to vary in both profile and dimension, and sizes are generally imperial rather than metric.
Durability requirements
Maintenance is an ongoing requirement with timber weatherboards. Under New Zealand Building Code clause B2 Durability, exterior wall claddings must have a minimum durability of 15 years.
Table 2 in NZS 3602:2003 Timber and wood-based products for use in building identifies timbers – and treatments where required – that meet the minimum 15-year durability requirement. For example, Pinus radiata must be treated to at least hazard class H3.1 and it must be painted. If treated to hazard class H3.2, it may be used without a paint coating. Western red cedar, redwood and heart cypress do not require preservative treatment and may be uncoated or stain- finished, while larch, which does not require treatment, must be painted.
Fixing weatherboards
All horizontal timber weatherboards are lapped and fixed using one nail fixing per stud along the length of the boards. The fixings allow movement as a result of moisture and reduce the likelihood of the boards splitting, bowing or cupping. energy dissipation, ductility, strength and stiffness for prescriptive and specific engineered wall bracing designs. Damage during cyclic loading was less for the SIPs than most of the more commonly used bracing systems.
Bevel-back weatherboards have a thicker bottom edge, which reduces the risk of cupping, while gaps behind the boards limit the board contact with the framing and improving drying behind the cladding.
Rusticated weatherboard have a rebate along their bottom edge that forms the lap over the board below.
The reduced thickness of the rebate makes the boards more prone to deformation and splitting, and a minimum 2mm expansion gap in the rebate must be provided to prevent the timber from buckling (see Figure 1).
As rusticated weatherboards have a flat, rear face with a greater board to framing contact, the drying that can occur behind the boards is more limited.
Timber fixings must have the same durability as the cladding, which is not less than 15 years. Protection of fixings to meet durability requirements is based on the exposure zone of the building as defined in section 4 of NZS 3604: 2011 Timber-framed buildings.
Common problems
While timber weatherboards have shown excellent durability over many years, deterioration of the timber will occur if not maintained. Weatherboard failure can compromise weathertightness
and cause serious damage to the structure and other parts of the building. Any failure should be repaired or replaced as soon as possible.
The most common cause of timber deterioration is failure of the protective paint coating, allowing timber to get and remain wet, which ultimately causes rotting. Paint failure may occur because of paintwork exceeding its serviceable life, poor preparation prior to painting, an incorrect paint system being used for the situation or timber or fixings that have corroded. Other reasons for timber failure include:
- Split or cracked boards due to incorrect fixing such as double nailing (which restricts timber movement), fixing through laps or fixing too close to cut ends.
- Bowing or cupping because of incorrect moisture content at the time of installation, insufficient gaps to allow movement between boards or a failure to prime the back face of the weatherboards.
- Nails popping, which occurs if the moisture content of the framing is too high when weatherboards are fixed or there has been inadequate nail punching and/or stopping.
- Failure at joints or gaps in running joints or mitred external corners, all of which admit water into the timber.
- Damaged plugs, scribers, facings or boxed corners.
- Corroded metal fixings, flashings and soakers will also cause timber deterioration. Corrosion occurs because of poor maintenance, damage to protective coatings, or incorrect metal selection for location or timber compatibility.
Exposure to marine conditions and airborne pollutants or attack from cedar, redwood or copper-based treated timbers are all corrosive to zinc coated steel.
There are also problems with timber weatherboards that, while not impacting on the weathertightness of the cladding, do affect the appearance.
These include:
- Differential weathering between exposed and sheltered areas of cladding – particularly where timber is uncoated.
- Resin bleed through the paint.
- Fine cracking of the paint finish, typically at board laps, due to timber movement.
- Timber movement opening up lap end joints.
- Fading and chalking of the paint finish, especially when dark colours are used.
Maintenance of timber weatherboards
Timber cladding should be washed down with water – or a chemical wash, if necessary – every six months in a coastal environment and annually when further away from the coast to prevent a build-up of dirt, dust, mould and mildew.
Avoid using high-pressure water such as a waterblaster, which can erode the paint surface and drive water between laps and behind facings. Regular washing also helps early identification of signs of cladding deterioration.
1. Repainting
The most effective way to maintain weatherboards in good condition is to repaint regularly.
If the paintwork is undamaged, the weatherboards can simply be washed and repainted. Wash paintwork with water to remove dirt and mildew.
If the paintwork is flaking or peeling but the timber is sound, the flaking or peeling paint should be removed by scraping and sanding. Wash the paintwork and prime all exposed timber before repainting. Where the paintwork is in poor condition, the best solution may be to completely strip the paint back to bare timber using either a chemical paint stripper or a hot air gun before priming and repainting.
2. Removing lead based paint
Before 1970, most houses were painted with lead-based paint. Care must be taken when removing this to avoid toxic fumes and soil contamination. It is not possible to identify lead-based paint by appearance, but it can be tested by using a lead-based paint test kit. When removing lead-based paint from the exterior, ensure all windows and doors are closed and collect paint debris on a groundsheet.
Seal the paint debris in heavy-duty plastic bags and dispose of it in accordance with local council requirements.
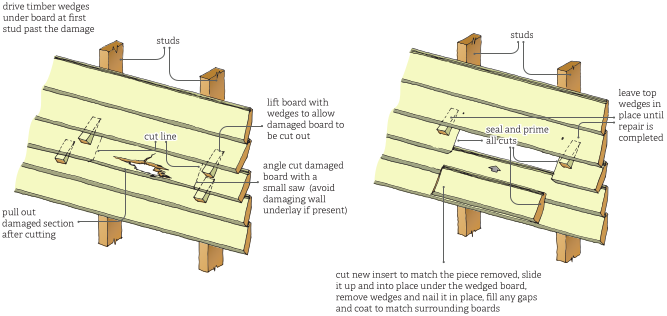
3. Rot or decay
Rot or decay in timber is generally visible but can also be easily confirmed by prodding the timber with a screwdriver. If the screwdriver goes into the timber easily, the timber is rotten.
The rotted section of timber should be removed to at least 1m beyond the extent of the rot and the cut sections on both sides of the cut area sealed and primed (see Figure 2). The framing timber should be checked to ensure that the rot has not spread. If it has, extensive repair work is required.
3. Cracking and splitting
If there is no water entry, the timber is sound and the crack or split is not more than 2 mm wide and 400mm long, it can be filled with putty or exterior-grade flexible filler, then sanded and painted over. If the crack or split allows water entry into the wall cavity, the board should be replaced.
4. Bowing and cupping
If the bowing or cupping is minor and no water is getting behind the cladding, the boards may be left. Ensure that all nails are fully punched and stopped. If the boards had been finished with a clear coating or stain, new coatings should be applied. If the timber had been uncoated, the application of a clear finish, paint or stain to reduce moisture absorption is recommended.
If bowing or cupping is pronounced and water is getting in, the boards should be replaced. Do not attempt to remedy the problem by double nailing as this will almost certainly cause the boards to crack in the future.
6. Popped or corroded nails
If nails are proud of the weatherboards, punch them in or, if possible, remove them and replace with larger, stainless steel, annular grooved or galvanised nails or with countersunk screws.
Screws are more likely to reduce the likelihood of nails re-popping as they have better holding power than nails.
For minor corrosion of nails in painted weatherboards, sand the affected areas to remove rust or oxide staining, then apply a galvanised primer followed by two coats of paint.
Alternatively, punch nails at least 5 mm into the timber cladding and apply a rust killer to the punch holes, followed by paint primer. When dry, stop the holes with putty or exterior-grade filler, sand and repaint with at least two coats of paint.
For unpainted weatherboards, remove old nails if possible and replace with stainless steel or silicone bronze nails.
Punch nails in if they cannot be removed. The timber may be sanded to remove staining but it is likely to reoccur, and until the timber weathers, the sanded area is likely to be more obvious than the stain.
7. Corroded metal fixings, flashings and soakers
Where there is minor surface corrosion of steel components, sand the affected areas to remove rust or oxide staining, then apply a galvanised primer followed by two coats of paint. If corrosion has weakened flashings or soakers, remove and replace them in accordance with E2/AS1.
8. Gaps in running joints or mitred external corners
Where gaps are no more than 3-4mm, the joints should be cleaned out and loose paint removed.
Apply primer to the gaps, then fill joints with exterior-grade flexible filler before sanding and painting.
9. Missing or damaged plugs and scribers
Damaged or missing plugs can be replaced and sealed using an exterior-grade paintable sealant. Once the sealant is dry, the area can be primed and painted.
If scribers are in good condition with no rot, they can be removed, cleaned and primed, then replaced and sealed using a sealant applied to the board edges and the profiled scriber edges. Once the sealant is dry, the area can be primed and painted.
This article was first published in BRANZ’s Build 197 magazine. www.buildmagazine.co.nz. Words supplied by BRANZ.
Register to earn LBP Points Sign in
5 Comments
Leave a Reply
You must be logged in to post a comment.

good one
Good one
Good one
Good one
good to know