Facts about safety nets
10 Mar 2015, Featured, Prove Your Know How, Technical
Growing awareness about improving safety has seen a significant increase in the use of safety nets on building sites – but don’t get caught out not knowing how to use them correctly
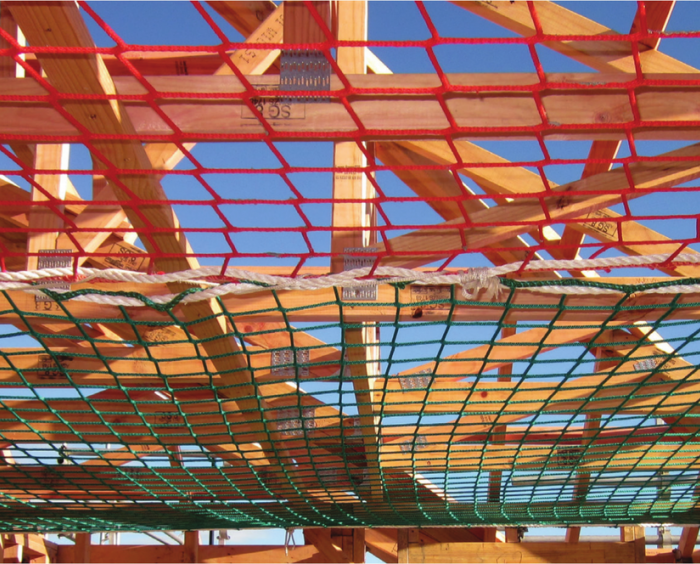
Figure 1: Safety net showing two nets joined with coupling ropes

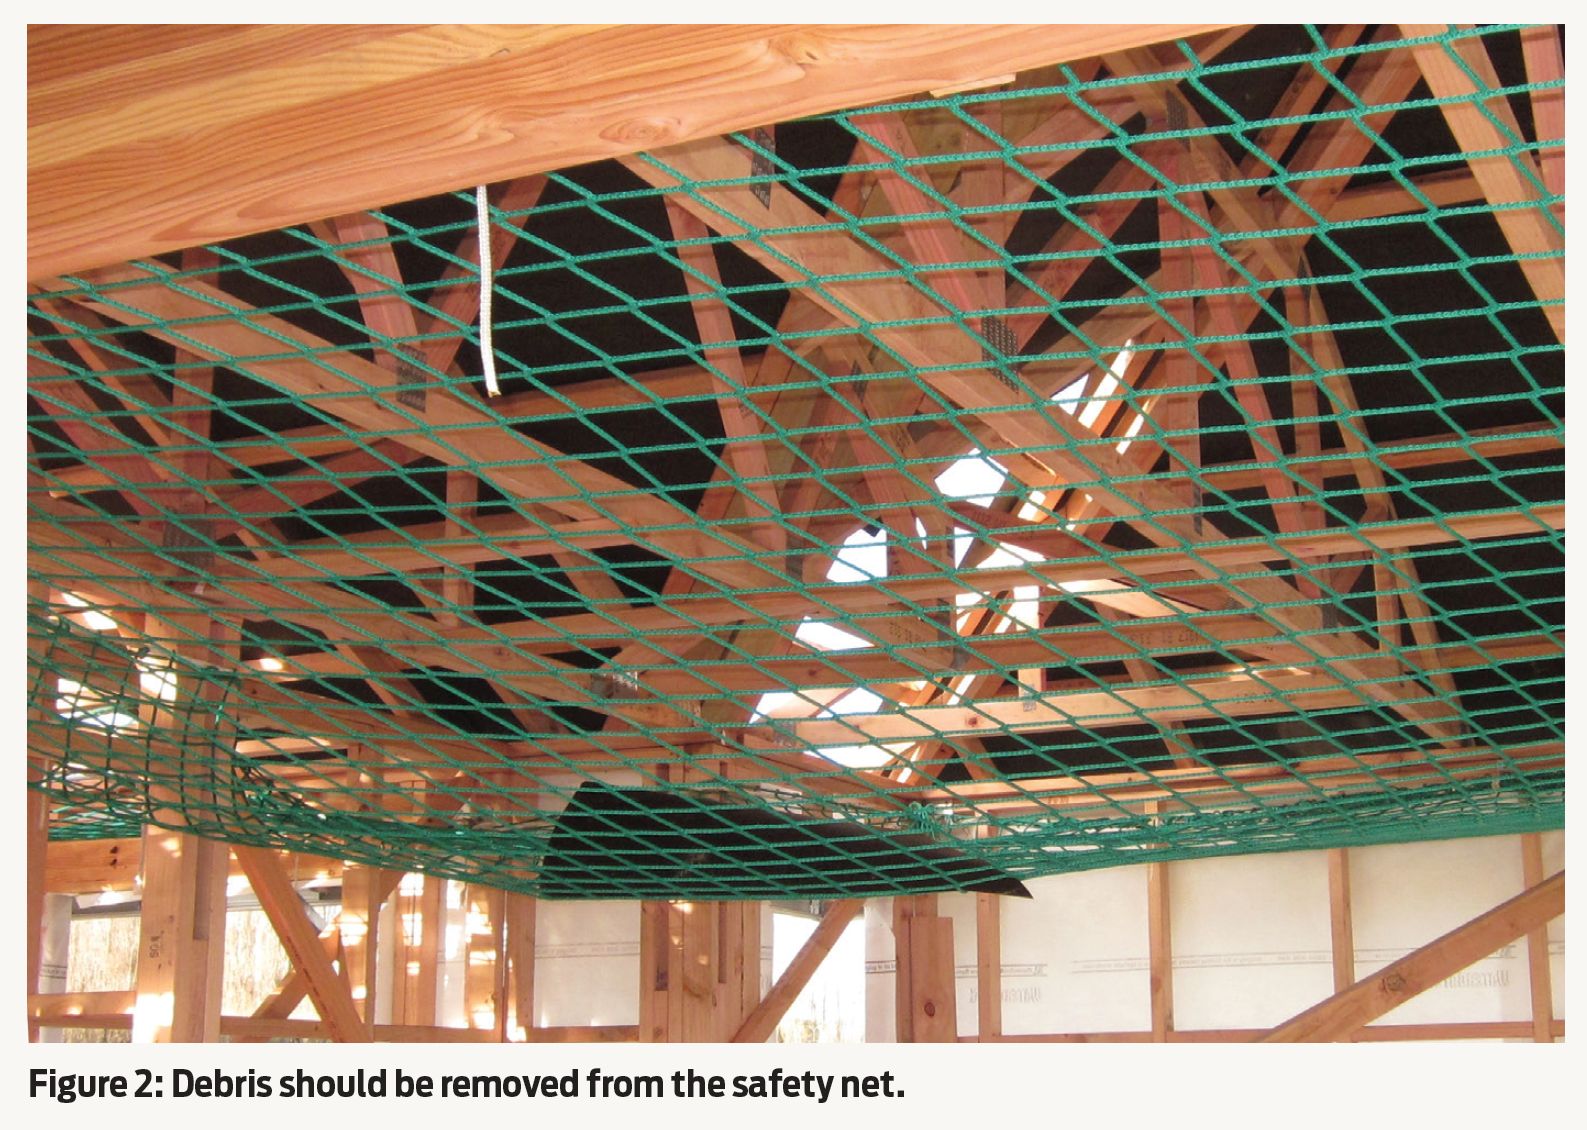
Figure 2: Debris should be removed from the safety net
Safety nets are installed below elevated work areas to reduce potential fall distances and are designed to progressively deflect or stretch. If a fall occurs, the net absorbs the impact and provides a soft landing, reducing the likelihood of injury (see Figure 1).
The greater the height from which a person falls, the greater the impact. Nets must be able to absorb all the energy generated by falls from the maximum fall height they are designed for. Here are a few things to consider when selecting and installing nets:
Clearance distance – is the distance below the net that must be clear of objects, so that a person falling does not strike an obstacle or the ground while the net is deflecting.
Standards covering safety nets – there are currently no New Zealand standards covering safety nets. WorkSafe New Zealand has published best practice guidelines: Safe use of safety nets. This is available online and references the British/European Standard, BS EN 1263 Parts 1 and 2.
Compliance – safety components and installation of nets should comply with BS EN 1263 or equivalent.
Knotted vs knotless nets – safety nets may be knotted or knotless in either a square (Q) or diamond (D) mesh arrangement. Knotted and knotless nets react differently under impact.
When a load lands on a knotted net, the knots tighten near the impact. The tightening is permanent and reduces the amount of energy the net can absorb in future impacts.
Knotless nets do not lose absorption capacity following an impact. They also tend to result in fewer facial or graze injuries when a person falls into them.
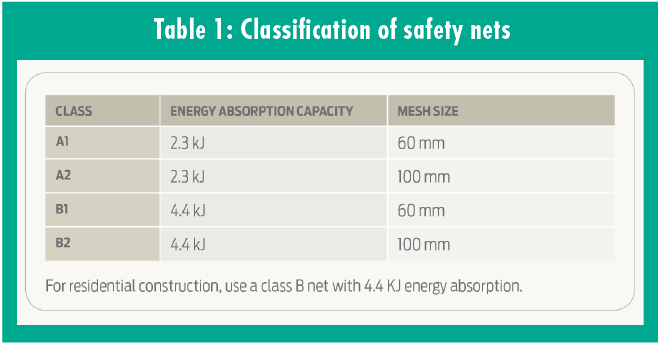
Classification
BS EN 1263 classifies nets in two ways (see Table 1):
- The maximum energy absorption capacity – how much energy a net can absorb, measured in kilojoules (kJ). The capacity for class A nets is 2.3kJ; for class B nets it is 4.4kJ.
- The mesh size measured in millimetres – class 1 mesh size is 60mm; class 2 is 100mm.
Components
Safety nets consist of different types of ropes, including:
Mesh ropes – a minimum of three separate strands of rope braided in such a way that they cannot unravel.
Border ropes – a continuous rope that is threaded through each mesh around the perimeter of the safety net.
Tie ropes – fasten the safety nets to structural elements and/or anchor points on a structure.
Coupling ropes – join nets together when more than one net is needed to protect an area (see Figure 1).
Labels are a must
All safety nets must have a permanently attached label with information about the net, including:
- The manufacturer’s name and code.
- Date of manufacture.
- The class.
- Mesh size.
- Configuration.
- Energy absorption capacity of the net.
- A unique identity or serial number (ID).
If there is no label attached to a net or the label is not legible, the safety net must not be used!
Removable test mesh
Every safety net must be tested for UV deterioration at least once every 12 months. New safety nets should come with at least three test meshes, which are loosely woven into the net and can be removed one at a time for testing.
Each test mesh must have the same ID number, be made from the same material, and be produced in the same batch as the net to which it is attached. A label showing that the net has been tested in the past 12 months and that it meets the manufacturer’s minimum energy absorption capacity must be displayed on every safety net. The test label is valid for 12 months and must not expire while a net is installed.
Installation
Safety nets may be attached with either tie ropes or karabiners to structural elements, such as trusses, rafters and top plates, or to specifically designed anchor points on the structure being netted. They must not be attached to purlins, battens or non-structural components such as gutter supports, pipework or electrical service installations.
The recommended maximum spacing between fixing locations is 1.5–2m. Fixing locations and anchor points to which safety nets are fastened must not have sharp edges that could damage or cause abrasions to any of the ropes.
Only an appropriately qualified person should install safety nets. They need a fall arrest safety equipment training (FASET) certification – the only recognised qualification for safety net installation.
Rescue plan
Before any work begins above safety nets, ensure there is a rescue plan detailing the procedure that will be followed if someone falls into a net.
Nets must be easily accessible, to carry out a rescue and to remove debris. They must not be used for storage, as a work platform, or for providing access to a work platform.
Any equipment required to carry out a rescue must be on site and available at all times. All workers on the site must know what the rescue plan is and their role in a rescue. If possible, a practice rescue should be carried out before starting work above the safety net.
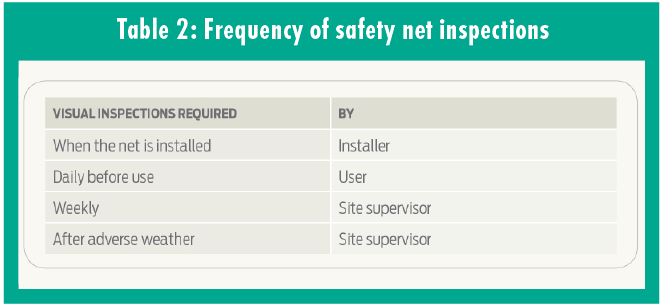
Regular visual inspections
Carry out regular visual inspections of the safety nets and keep records of all inspections on site. Table 2 outlines the required frequency of visual inspections. A visual inspection includes checking for:
- Incorrect installation.
- Mesh abrasion.
- Cuts or nicks in mesh.
- Heat or friction damage to mesh.
- Damage to stitching.
- Damaged or deformed fittings.
- Debris in the net.
- Defective knots – if the net has knotted mesh.
- UV degradation – although this is generally not visible.
If a net does not pass the visual inspection, it must not be used; it should be removed and either repaired or taken permanently out of service.
Removing debris
As well as catching a falling person, safety nets will also catch falling debris. Debris can damage the net and becomes a hazard if left in the net, as it may cause:
- Injury to a person who falls.
- The net to overload and deflect too much.
- The net to sag and increase the fall distance.
When debris falls onto a safety net, work should stop immediately above and below the net. The debris should be removed and the net checked for damage before work resumes (see Figure 2).
Safety nets on residential sites
BS EN 1263 applies only to safety nets that are over 35m2, and where the shortest side is at least 5m long. On residential construction sites, individual safety nets are seldom bigger. Therefore, specific recommendations for safety nets that are less than 35m2 include:
- The fall height should be no more than 2m.
- A class B net with 4.4kJ energy absorption capacity should be used.
- Don’t store materials below the net in the clearance distance – sufficient clearance needs to be maintained.
- Consider brace placement to maintain clearances.
- The net should have an initial sag of approximately 5–10% of the shortest side of the net.
Register to earn LBP Points Sign in