RETROFITTING INSULATION
16 Mar 2020, Learn, Prove Your Know How, Technical
Tricky access can be a problem when retrofitting insulation into an older home. However, as the push continues to insulate homes, we look at some of the options and things to consider
Houses built before 1978 were not required to be insulated, and some older houses still have no insulation or are only partially insulated. Where insulation has been installed, it often does not meet current Building Code requirements and is not performing satisfactorily.
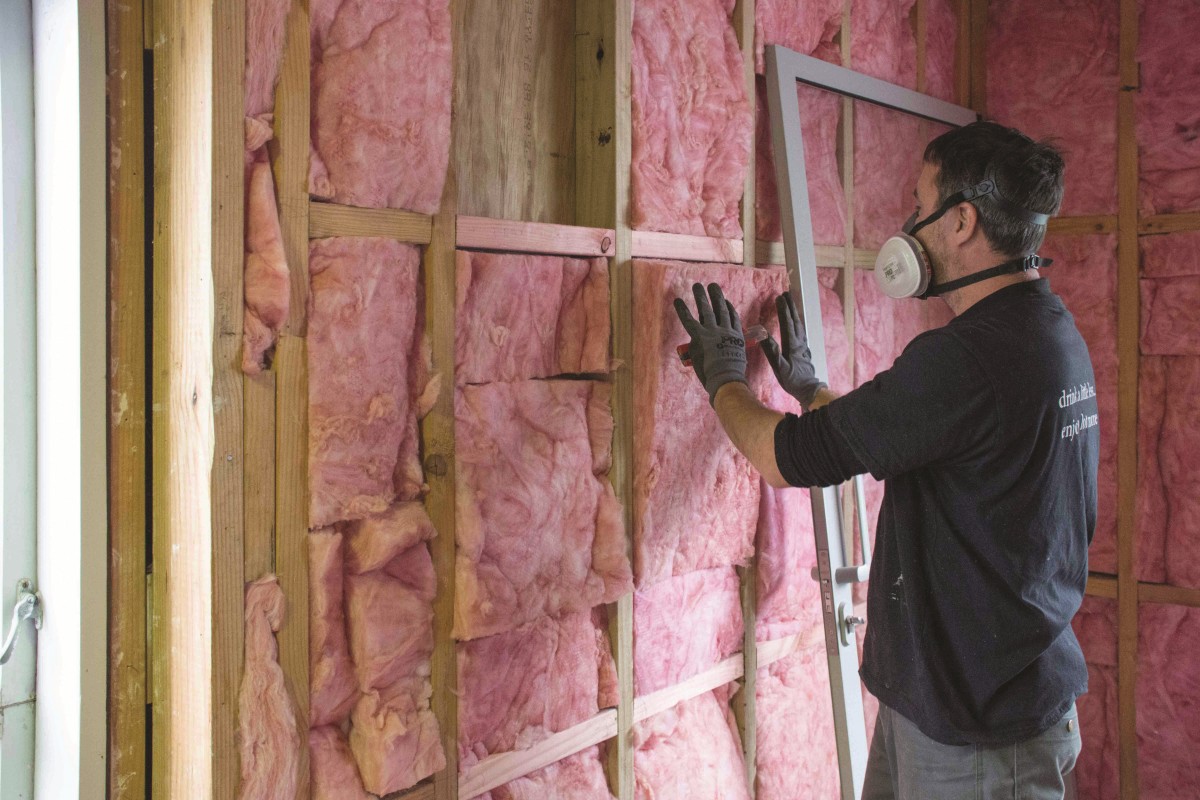
Retrofitting insulation into an existing building is not always easy, and options may be limited by accessibility and cost. For example, walls, skillion roofs, low-pitched roofs and some underfloor spaces are hard to access, making installation difficult, and the cost may not be justified.
However, the Healthy Homes Act, which became law on 1 July, 2019 requires a minimum standard for insulation in rental properties.
Building code requirements
The principal Building Code clauses applicable to insulation are clause H1 Energy efficiency, clause E3 Internal moisture and clause B2 Durability.
New building work, such as extensions, must have insulation installed that complies with the requirements of these clauses, while alteration work must comply with the Building Code ‘to at least the same extent as before the alteration’.
In theory, if a new window is inserted into a wall, additional insulation may be required in the wall to offset the reduction in thermal performance as a result of the window installation.
A building consent is required to retrofit insulation into existing external walls, but the installation of underfloor and roof insulation does not require a building consent. This is because the installation of insulation in the walls may have a significant impact on the water management and hence durability of the wall.
Options for installing roof insulation
NZS 4246:2016 Energy efficiency – Installing bulk thermal insulation in residential buildings provides guidance on the methods of installing bulk insulation in light timber-framed and steel-framed buildings and covers both
new and existing buildings.
Insulation can be installed, retrofitted or upgraded relatively easily in roof spaces that have good access by either:
- Fitting bulk insulation between and over ceiling joists or bottom chords of trusses.
- Installing blown-in loose-fill insulation.
Skillion roofs have limited access, so it is not as easy to fit insulation, but it can be installed by:
- Removing the roof cladding.
- Removing the ceiling lining.
- Fixing battens to the underside of the existing ceiling, fitting insulation between the battens and installing a new ceiling lining.
- Building a suspended or lowered ceiling into which insulation can be inserted.
- Inserting insulation between exposed rafters and installing new ceiling lining over the rafters.
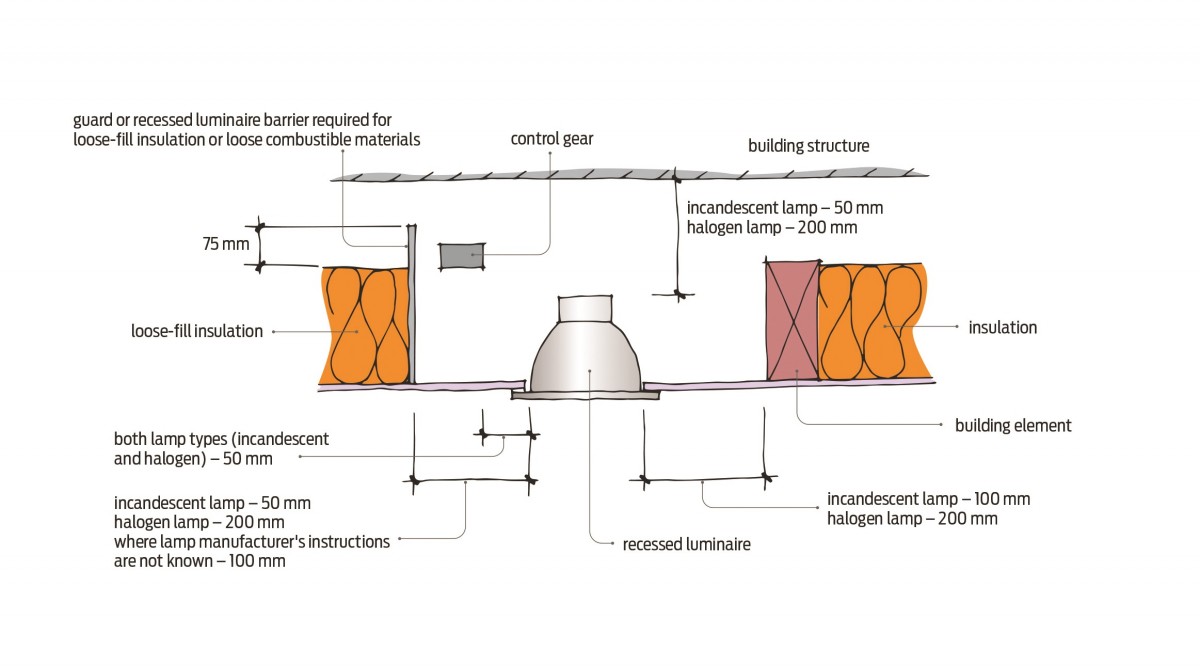
Check recessed downlight ratings
Recessed luminaires – or downlights – are common in ceilings of houses built since the 1980s. Older recessed downlights must not be covered and require a 100mm gap between the downlight and the insulation.
Newer downlights are likely to have a rating classification marked on the fitting. According to the rating, they may:
- Be covered with insulation (IC or insulation contact)
- Abut insulation (CA or close abutted)
- Have no clear marking and require a minimum clearance from both insulation and other building elements in accordance with the manufacturer’s instructions or the default clearances given in NZS 4246:2016 and AS/NZS 3000:2007 Electrical installations (see Figure 1).
The same rules apply to the driver units. If the units can be separated from the light, they will be marked as well.
If downlights are being replaced, unmarked fittings must be considered to have a do-not-cover classification and cannot be installed in residential buildings.
Opportunity if replacing linings or cladding
If linings or claddings need to be replaced, it is a good opportunity to install insulation at the same time. There are other options available that don’t require linings to be removed, such as blown-in insulation. BRANZ is currently researching these options and will report on them in the future.
Timber cladding
When replacing external cladding, insulation can be installed between studs from the exterior. Lay new wall underlay over the framing before the new cladding is fixed. The new cladding needs to be installed at the same time as the insulation and underlay is fitted. Otherwise, a suitable protection such as temporary tarpaulins should be provided to protect the insulation until the new cladding is installed.
When replacing internal linings, insulation can also be installed between studs. Check the underlay first and only install if there is underlay and it is in good condition. If there is no underlay or it is in poor condition, there are
two methods described in NZS 4246:2016 section 5.4.1.
BRANZ’s preferred option is installing the insulation with a 20mm minimum gap between the back of the cladding and the insulation to allow for drainage and drying.
Exterior concrete masonry or in situ concrete walls
Insulation options for concrete masonry or in situ concrete walls include:
- Installing an Exterior Insulation and Finish System (EIFS) system to the exterior.
- Strapping, insulating and lining the internal face of walls.
Suspended timber floors
Where there is good access to the subfloor space, insulation can be fitted between the floor joists. Insulation that is specifically designed for installation under floors includes friction-fitted polystyrene and bulk insulation blankets or rolls.
Both types must be fitted closely to the underside of the floor, leaving no gap for air movement.
If wind wash is an issue, consider:
- Attaching sheet material, such as polythene, hardboard or plywood, to the underside of the joists to protect the insulation.
- Using a high-density insulation that is not affected by wind wash.
- Putting in extra insulation to compensate (see BRANZ Study Report SR354).
In exposed or wind-wash areas, it’s important to use fixings or strapping to hold the insulation in place. This should follow NZS 4246:2016 or the manufacturer’s instructions.
Reducing heat loss from concrete floor slabs
If renovations are being carried out and there is sufficient internal ceiling height, the existing floor slab may be overlaid with a polythene membrane, 25mm thick polystyrene board and a 75mm minimum thick concrete topping slab laid over the polystyrene.
The concrete topping slab should also be isolated from the existing timber framing with a damp-proof membrane to prevent moisture from the concrete being absorbed by the timber.
Opportunities to improve perimeter
The perimeter of a concrete slab is even more important for heat loss.
Retrofitting 25mm of extruded polystyrene vertically down the outside of the footing is likely to improve the thermal performance as much as the topping slab insulation.
See BRANZ Study Report SR352 Perimeter insulation of concrete slab foundations, available from www.branz.co.nz/study_reports.
This article was first published in issue 175 of BRANZ Build magazine. www.buildmagazine.org.nz. Words and figures supplied by BRANZ.
Register to earn LBP Points Sign in
5 Comments
Leave a Reply
You must be logged in to post a comment.

Good information.
Good information
Good Information Question 2
Handy info
good stuff