Cutting concrete to install a drain
22 Jul 2024, Learn, Prove Your Know How, Technical

Following these 14 steps will ensure a new drain is successfully installed into an existing concrete slab, says BRANZ technical writer David Hindley
When a concrete slab on ground for a new house is designed and poured, it should already include all the necessary provisions for drainage and other services.
Where an existing slab needs to be cut for a new waste pipe or drain to be installed, repairing the cut in the right way is crucial for the slab’s strength and resilience.
Relevant Building Code clauses and standards
The work must comply with Building Code clauses and standards, including:
- B1 Structure.
- B2 Durability (a minimum of 50 years).
- G13 Foul water (for wastewater pipes) – compliance can be demonstrated several ways, including through the use of G13/AS2 or G13/AS3, which reference AS/NZS 3500.2:2021 Plumbing and drainage – Part 2: Sanitary plumbing and drainage.
- NZS 3604:2011 Timber-framed buildings section 3 Site requirements and section 7.5 Concrete slab-on-ground floors for timber buildings as modified by B1/AS1.
Involve an architect or engineer
An architect, LBP designer or chartered professional engineer will typically be involved in making the decisions over what is required and how compliance with the Building Code and standards will be demonstrated. They will need to confirm which Acceptable Solution or standard they intend to comply with prior to lodging a Building Consent. For example, they will need to choose G13/AS1 and G13/AS2 or G13/ AS3 (AS/NZS3500.2) as the pathway, as you cannot mix the two solutions.
The engineer may be able to advise on the stability of the slab and the design of the new slab and reinforcing prior to consent. However, this may be best done on a site inspection after the slab has been cut.
Consider whether the physical work of repairing the slab can be carried out by the existing building contractor or whether a specialist should be brought in – the drain laying itself will need to be carried out by a registered drainlayer.
In some cases, proposed drainage plans may show a different option to run drainage without having to cut the slab. However, where this is an option the architect or designer will usually be involved in the decision. The property owner should always be informed of proposed work.
The process
In practical terms, the work is a 14-step process (see Figures 1, 2 and 3):
1. Saw cut the slab and remove the concrete, reinforcing, DPM, insulation and so on.
Take care not to cut or remove the slab perimeter reinforcing bars. If this is not possible, engage an engineer to oversee and instruct the work.
2. Dig out the ground under the slab to the required depth.
Ensure that at least the minimum required falls in the drainage pipe will be achieved. Pipes under a concrete slab complying with G13/AS2 must be laid straight with an even and maximum practicable fall.
3. Prepare bedding for the pipe.
The pipe must be on a minimum 150mm compacted base bedding of sand or other granular material.
4. Lay the drainage pipe to the required falls and backfill over the pipes.
The clearance between the top of the pipe and the underside of the slab must be no less than 25mm under AS/NZS 3500.2:2021 or 50mm under G13/AS2. Where a drain enters or exits from under a building, G13/AS2 says there must be an access point within 2.0m outside the building.
5. Lay sand blinding over the backfilled drains and level it out.
6. Lay DPM such as polythene and tape all the edges.
Forming a waterproof junction between new and existing DPM can be difficult but is crucial for a number of reasons, including avoiding the risk of groundwater entering and corroding the reinforcing steel.
7. Lay insulation over the sand blinding if required.
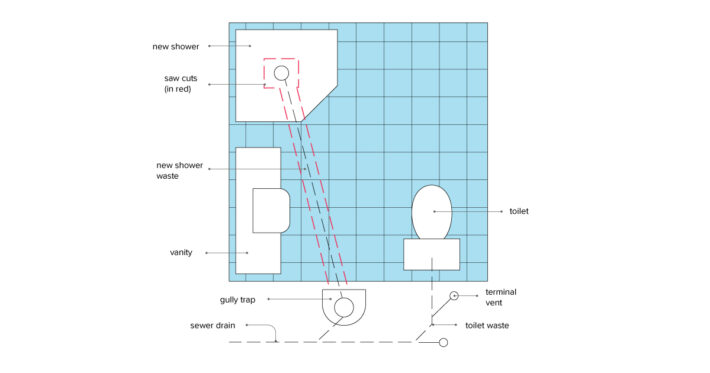
Figure 1: Plan for a new shower waste
8. It can be useful to scabble out a further 250mm around the existing mesh to support good reinforcing connections.
This is more typically done on commercial projects where engineers may require it. It is often not carried out on smaller residential projects.
9. Drill into the slab edges around the opening to allow placement of new reinforcing bars.
Approximately 50mm (confirm all measurements with the engineer) below the slab surface (NZS 3604:2011 requires a minimum 30mm cover). Cut starter bars of approximately 400mm long from D12 dowels (or to match existing reinforcing or as an engineer specifies). Place the starters at approximately 150-300mm centres in accordance with the engineer’s instructions.
10. Use epoxy resin (as specified by the engineer) to fix the starters in place usually by injecting it into the holes.
Clean the concrete first by water blasting and using compressed air. Ensure the concrete is dry before installing the epoxy resin, usually a two-part formula, and accurate proportioning and mixing of the constituents is important. Both pot life and curing times are sensitive to temperature. This work should not be carried out below 5°C or above 30°C. Consult the manufacturer for use outside this temperature range.
Once the starters are in place, insert plastic safety end caps on the exposed cut ends to protect from injury while the epoxy resin sets.
11. When the epoxy resin has set, tie the reinforcing bars to the starter bars.
12. Lay new mesh within the opening and tie it to the existing mesh.
13. Prepare to pour the slab to the correct specification
For example, 20MPa. Concrete strength must meet the requirements of NZS 3604:2011 sections 2.6 and 4.5.
14. After pouring, ensure the slab is cured to reduce the risk of cracking.
Note that prior to covering the draining and again prior to pouring the concrete, the BCA may need to carry out inspections before being able to issue a Code Compliance Certificate. It is a good idea to photograph each stage of the works, so you have evidence of exactly what was done, the process and the materials used.
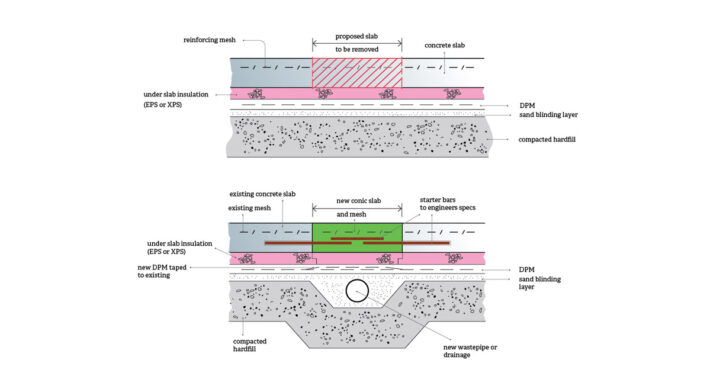
Figure 2: Proposed drainage under slab detail
This article was first published in BRANZ’s Build 202 magazine. www.buildmagazine.co.nz. Words supplied by BRANZ.
Register to earn LBP Points Sign in


