Stabilising wing walls
21 Jul 2023, Learn, Prove Your Know How, Technical
Correctly stabilising wing walls in wet areas such as bathrooms is important to ensure the waterproofing membrane is not compromised. Architect Bruce Sedcole shares tips on how to mitigate this issue
Recent callers to the BRANZ helpline have highlighted that there are more frequent requests for information from building consent authorities about the stability of internal wing walls –specifically walls that are not full stud height, and especially those located in wet areas.
Often near bathtubs or showers
These wing walls are often used in residential bathrooms and usually located adjacent to built-in bathtubs or shower enclosures. As the walls are not full height, they do not contribute structurally to loadbearing capacity or lateral bracing. They function primarily as a privacy screen or a surface to mount fixtures and fitments, such as tapware and shower screens or doors.
Located in wet areas and often near to, or at, the water source, they usually become part and parcel of the waterproofing system in these spaces. If the wing wall is finished in tiles – to match adjacent walls or floor – they may also be a vulnerable point of potential compromise of the waterproofing membrane, especially at junctions.
Deal with the top of the panel first
To stiffen internal wing walls, there are several options that need consideration.
The primary goal is to stabilise the unrestrained top corner of the wall and to eliminate any wobble or flex in the wall panel.
The first question is: how do we stiffen or constrain this free top corner of the panel?
There are a variety of methods. The rudimentary solutions involve connecting the free corner with a post to the ceiling above or with a horizontal connection rail – such as via a framed shower screen panel or door – to an adjacent wall.
However, while these may perform the required structural task, they often don’t meet the aesthetic expectations of either the designer or the client. To eliminate these potentially visually intrusive solutions requires a little more planning.
Wider timber framing for the wing wall
In my own architectural practice, we generally use wider timber wall framing to the wing wall – increasing the framing timber up to 140mm or even 190mm thickness. Tightly securing the bottom plate to the floor with staggered fixings – on either side of the longitudinal centre line – helps mitigate the possibility of the wall rocking.
We also generally forgo nail fixings from bottom plate to floor and tend to specify threaded fixings, such as coach screws, coach bolts or cast-in threaded anchors to reinforced concrete floor slabs.
Line the wing wall with rigid material
It is also helpful to use a strong, rigid lining material to the surface of the wing wall. Plasterboard linings – even if rated for wet area use – may still flex, potentially enough to compromise the performance of the waterproofing membrane system. It is far safer to use a strong inert substrate, such as a high-performing fibre-cement sheet lining, finished for internal use and installed in strict accordance with the manufacturer’s instructions.
In this situation, adhesive alone should not be relied on to attach the sheet lining. Instead, combine adhesive with a mechanical fastening system to ensure there is sufficient strength to hold the board, the weight of any applied tiles and any occasional additional lateral load that may occur.
However, even with these beefed-up specs for the construction of the wing wall, it is still prudent to install additional bracing that will resist any extra lateral loads that may be applied to the unrestrained top corner of the wing wall.
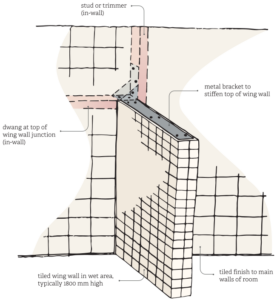
Utilising a bracket system
Over the years, my architectural practice has adopted a simple bracket system to stiffen the entire top edge of the wing wall (see Figure 1). We use a flat metal plate – usually aluminium – that has the same area and dimensions as the top edge of the wing wall framing, but is lengthened to extend into the wall cavity of the adjacent full stud height wall it abuts.
The plate is usually fixed to the top plate of the wing wall with countersunk screws, with another piece of the wall lining then fixed over it to receive tiles or a finishing coat.
To my knowledge, however, there are no off-the-shelf Acceptable Solution answers to this method. As there are several variables, we use a registered engineer to calculate the specific loads on the wall, design each bracket and issue a producer statement for the building consent application.
A solution from the States
There are other solutions available online that I have not seen used in Aotearoa New Zealand, but may be adaptable for use here. In the USA, these non-full-height walls are referred to as half walls, knee walls or sometimes even pony walls.
There, the common solution to making these wing walls sturdier on suspended timber floors is to create a vertical cantilever with the wall. Each wall stud is continued straight down
through the floor, alongside each joist or trimmer, or blocking as required, and attached to the subfloor or floor framing.
This means opening up the floor from above in alterations to existing construction, but the online instruction videos make it look fairly straightforward. Care would be required with both framing and waterproof membrane application detailing, but this appears to be a robust, time-tested solution.
Feedback welcome
I am keen to hear feedback from readers regarding any other methods that may have been successfully used to stabilise these walls – not only on suspended timber floors, but also reinforced concrete floor slabs and especially existing floors. You can contact me at bruce.sedcole@branz.co.nz .
This article was first published in BRANZ’s Build 195 magazine. www.buildmagazine.co.nz. Words supplied by BRANZ.
Register to earn LBP Points Sign in
2 Comments
Leave a Reply
You must be logged in to post a comment.

good
alright