Why is my floor cupping?
27 Jun 2022, Learn, Prove Your Know How, Technical
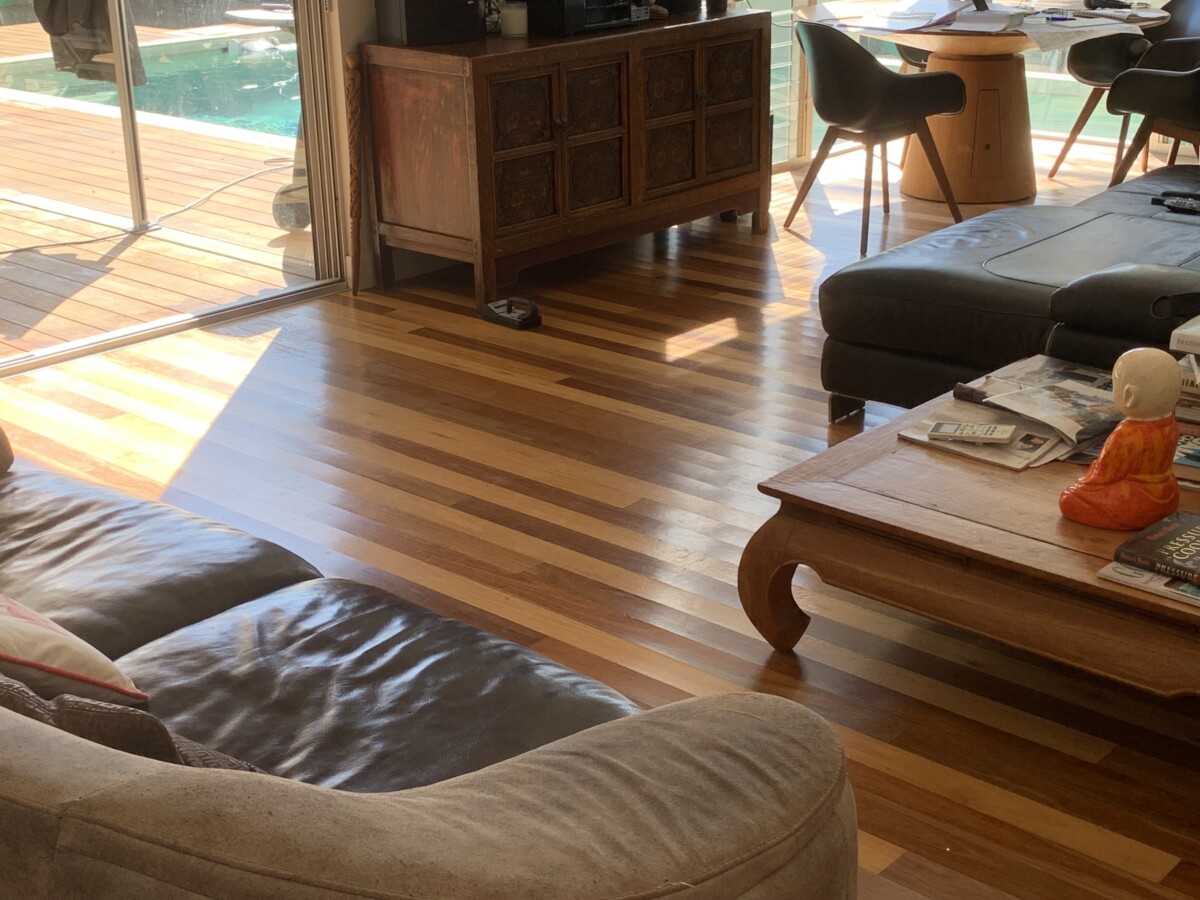
There can be several reasons why a solid timber strip floor may take on a cupped appearance where the board edges are higher than the centre of the board. This case study looks at the process of investigating why a floor cupped and how to fix it
Cupping of timber boards is often the result of a moisture imbalance through the timber boards. At other times, it is expansion pressure in the floor. By working through the process covered in this case study, you can identify the cause and remedy.
The flooring product
The flooring was solid 80×19mm mixed timber that had been fixed in secret with staples and adhesive to a particleboard subfloor on LVL timber joists. The floor had been coated with a water-based polyurethane.
What is being investigated and why?
When viewed in reflected light, the cupped shape to the boards in the flooring was quite evident (see main image above). There are three possible reasons a floor will have a cupped shape:
- Dry conditions above the floor.
- Moist conditions beneath a floor.
- Expansion pressure causing boards to peak at their edges.
Unless affected by specific heat sources, the industry would generally expect a floor to have a flat appearance, as did the owner in this case.
What needs to be considered?
The first aspect to consider is whether the boards are tight at adjoining edges or not.
If gapping is present, it often means that the moisture content has reduced from the time of installation with dry or very dry conditions prevailing above the floor.
If, however, board joints are tight, the floor is generally under some expansion pressure and either moisture beneath the floor or pressure effects in the floor are causing the cupped appearance. Check to see if cork expansion joints, if installed, have compressed. Measurement over 10 boards allows you to consider floor expansion.
Another aspect to be assessed is the moisture content of the flooring. For this, both resistance and capacitance moisture meters can be used. A resistance meter will mark the board surface and may not be appropriate to use. A capacitance moisture meter does not mark the board surface but will often only provide an indicative measure of board moisture content.
With a floor like this, it is useful to consider the humidity of the environments the floor is exposed to, including beneath the floor in the subfloor space and other subfloor aspects. Figure 2 below shows the subfloor space in the case study.

(Figure 2)
Investigation
During the inspection, it was observed that the board edges were tight and the cork expansion joint had closed a little. This was consistent with the floor being under some expansion pressure, but how much pressure?
The measurements over 10 boards only recorded an average board width of 80.2mm, so there was not a lot of expansion or expansion pressure.
Assessing the moisture content with a capacitance moisture meter gave variable results, which were considered to be due to a range of species in the floor and, in this instance, was not that helpful. It was also not appropriate to use the resistance meter.
So where to from here? The next step to continue the investigation was by assessing the relative humidity within the dwelling, outside the dwelling in a sheltered area and beneath the floor.
The dwelling’s family room spilled out onto a covered deck, and with patio doors open, we would expect similar relative humidity readings inside and out. We found 67% in the dwelling, 66% outside and 80% in the subfloor space. A 14% difference between external and subfloor humidities is a significant difference. You would expect the subfloor space to be a little cooler and a little more humid, but this degree of difference is greater than expected. Converting these relative humidities back to equivalent timber moisture contents, they would equate to 12% inside and 16% in the subfloor space.
What other observations are there from the subfloor space? It was apparent that the ground sloped and that the subfloor area could be prone to seepage. There was also only significant ventilation from one end and a lack of adequate cross-flow ventilation. In areas of no cross-flow, the soil was damp and resistance moisture meter readings in solid pine framing members were high at 17% to 19% (see Figures 3 and 4 below).

(Figure 3)

(Figure 4)
Analysis and outcome
With a bit of investigation, the factors contributing to the cause of the cupping began to fall into place.
Due to both seepage and insufficient cross-flow ventilation, subfloor relative humidity was being maintained at high levels for extended periods, causing the moisture content of the particleboard and lower floorboard to rise. This imbalance in the moisture content of the strip timber flooring above had caused the cupping.
Higher moisture in the lower section of the board causes it to expand more than the upper exposed surface – the consequence of this being the cupped shaped of the boards. In this case, it was not overly severe.
A plastic moisture vapour barrier over the soil can be very beneficial. In some cases, dealing with seepage can require subfloor enclosed drainage and perhaps a pumping system.
A lack of cross-flow ventilation can be addressed by the addition (and/or clearing) of vents. At times, mechanical systems have needed to be installed.
What we can learn from this?
There are two lessons we can take away from this case study.
Firstly, if you are laying floors over an enclosed subfloor space, undertake a site assessment. In this instance and with little effort, the lack of sufficient ventilation and presence of seepage should have been identified. These would then be raised with the builder and/or owner to correct. The flooring would not be installed until remediation of the subfloor space and moisture contents of the subfloor over which you would be laying are back to normal.
Secondly, if inspecting a cupped floor over an enclosed subfloor space, don’t confine your investigation to only what is happening above the floor. The most valuable information is often gained from what is happening below the floor and considering relative humidity differences.
Reproduced with permission from Australasian Timber Flooring Association Timber Floors Issue 44. Read more on www.atfa.com.au .
Register to earn LBP Points Sign in
2 Comments
Leave a Reply
You must be logged in to post a comment.
have seen these sorts of problems many times
good